Call REST API from Browser: Step-by-Step Guide
Table of Contents
- Where each calling task runs
- Build the request deliberately
- Define what success looks like
- Inspect the browser's actual exchange
- CORS symptoms, causes and fixes
- Use a server-backed credential lifecycle
- Make exposure recoverable
- Keep events separate from media
- Sketch the signaling flow
- Run the acceptance check
Adding mode: "no-cors" isn't how you fix a broken browser API call. To call a REST API from a browser, use fetch() over HTTPS, handle HTTP failures explicitly, and make sure the API authorizes your page's origin, method, and headers.
For a calling dialer, there's another boundary: REST controls the call, but it doesn't transport live microphone audio. A working implementation separates browser requests, server-side secrets, and the audio connection in real time.
Which Calling Tasks Run in the Browser
A browser can run the REST side of a calling workflow, including login, balance checks, rate lookups, and call requests. Live audio needs a separate real-time connection, not a sequence of REST responses.
fetch() is the modern, Promise-based alternative to XMLHttpRequest. The MDN Fetch API documentation describes its browser networking interface and integration with cross-origin security rules. That makes Fetch suitable for updating a dialer without navigating away from the page.
Where each calling task runs
The distinction matters when a user clicks Call. The page sends the destination to your backend, your backend authorizes the operation and checks the balance, and the calling system creates the session. The browser then negotiates its real-time connection.
Don't treat a successful call-creation response as proof that the recipient answered. It confirms that your backend accepted or created the requested operation, according to your endpoint's contract.
Our browser calling flow follows the same user-facing separation: enter a number, check the rate, and press call. The recipient sees an ordinary phone call and doesn't need BubblyPhone. The guide to calling a phone from a computer explains that experience without the implementation details.
Practical rule: If a feature requires a secret you couldn't safely publish, move that step to your server.
That includes signing private upstream requests and verifying incoming webhook signatures. Browser code should initiate user-authorized actions, not inherit your application's unrestricted authority.
How to Send Your First Authenticated Request
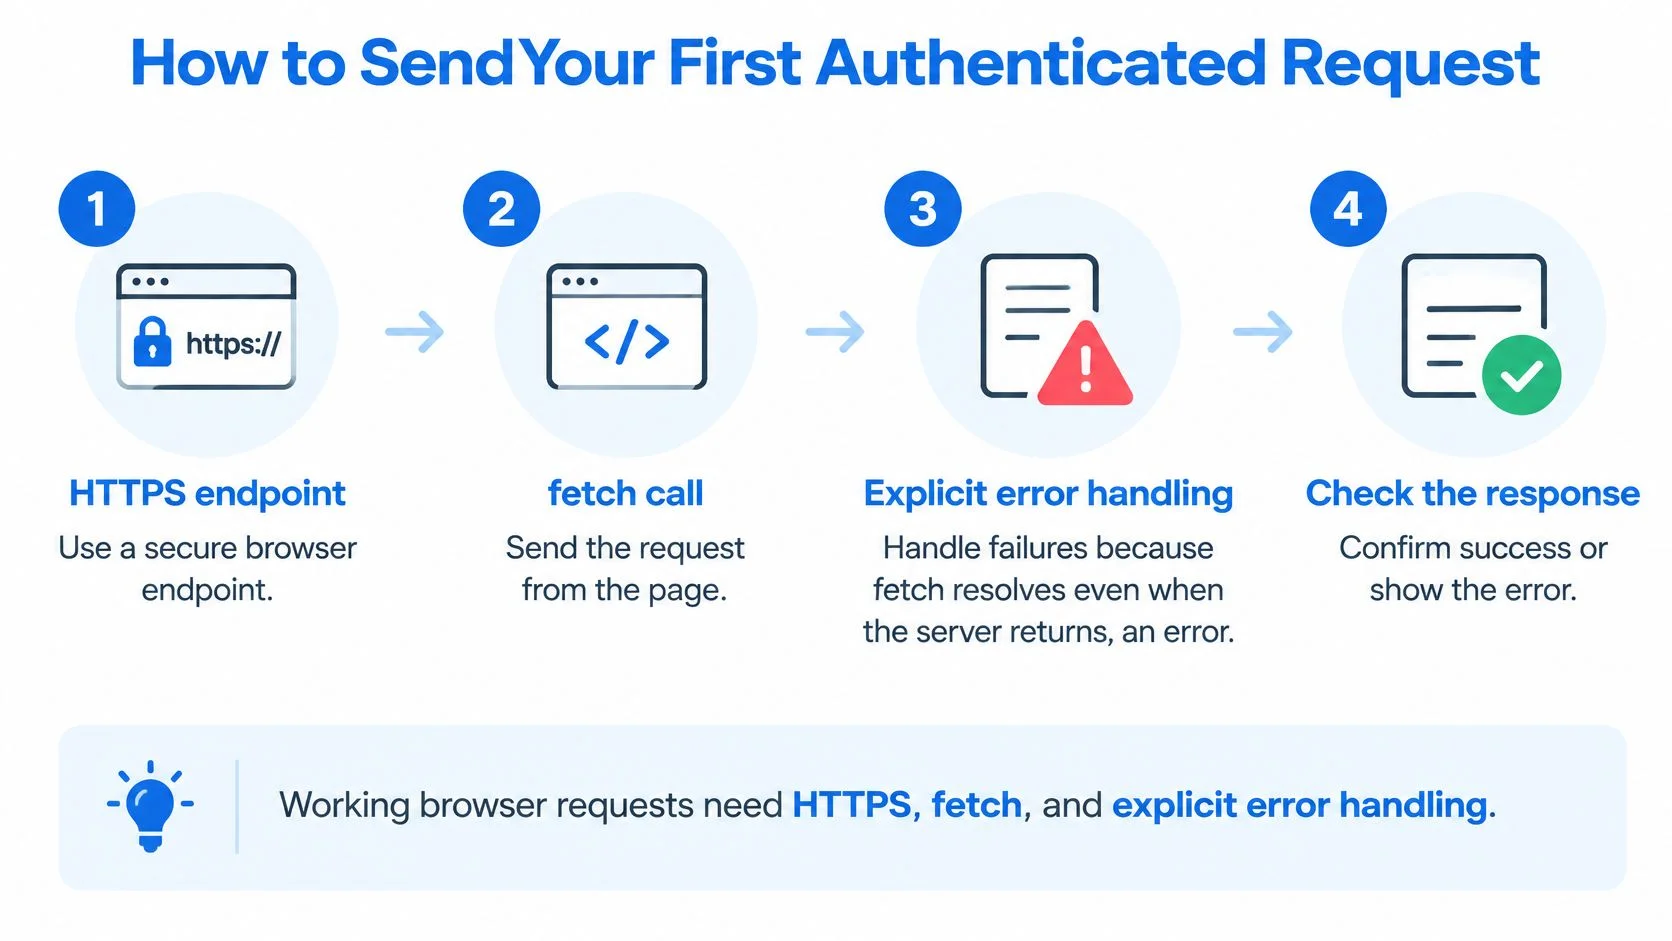
A working authenticated browser request needs an HTTPS endpoint, a fetch() call, and explicit error handling. Fetch doesn't reject its Promise just because the server returns an HTTP error, as the MDN guide to using Fetch explains.
The request flow should make failure visible rather than leaving the dialer spinning.

Build the request deliberately
- Expose an HTTPS endpoint. Use your own backend's call-creation route. The example below uses a relative path so it doesn't assume a particular API host.
- Pass the method, headers, and body. Make the destination an explicit request field, and validate it again on the server.
- Set the correct content type. Use
Content-Type: application/jsonwhen sending JSON, not automatically on every request. - Inspect the response status. Check
response.okbefore treating the operation as successful. Authentication failures and throttling still produce resolved Fetch responses. - Consume the body once. Choose
response.json()orresponse.text()according to the contract. Reading the same body twice throws because it's already been consumed. - Separate failure categories. Distinguish HTTP errors from network failures, cancellation, timeout, malformed JSON, and a valid response containing an application-level rejection.
This illustrative function assumes accessToken lives in memory. The caller retains the idempotency key so a retry can reuse it.
async function placeCall(to, attemptKey, signal) {
  let response;

  try {
    response = await fetch("/v1/calls", {
      method: "POST",
      headers: {
        "Content-Type": "application/json",
        Authorization: `Bearer ${accessToken}`,
        "Idempotency-Key": attemptKey
      },
      body: JSON.stringify({ to }),
      signal
    });
  } catch (error) {
    if (signal?.aborted) throw signal.reason;
    throw new Error("Network request failed", { cause: error });
  }

  const successful = response.ok;
  const status = response.status;
  const text = await response.text();

  if (!successful) {
    const error = new Error(`Call request failed (${status})`);
    error.status = status;
    throw error;
  }

  let data;
  try {
    data = JSON.parse(text);
  } catch (error) {
    throw new Error("Invalid JSON response", { cause: error });
  }

  if (data.error || typeof data.id !== "string") {
    throw new Error("Call response did not contain a valid call ID");
  }

  return data.id;
}
Use an AbortController to supply signal. If you implement a timeout, abort with a distinct timeout reason; a user cancellation should produce a different interface message. Aborting the browser request doesn't prove the server abandoned call creation, so preserve the attempt key.
Define what success looks like
For this example, define a successful response as HTTP 201 with a body such as {"id":"call_example","status":"queued"}. The page stores the ID and displays the queued state, rather than showing the call as connected.
When designing adjacent lookup or enrichment operations, Fetchin's sample JSON payloads for enrichment endpoints offer a separate resource for considering payload structure. Keep your own call response contract explicit.
For cross-origin requests, Authorization, JSON content, and Idempotency-Key trigger a preflight. The browser must approve that exchange before sending the business request.
Fix CORS Errors Using the Preflight Check
A missing or rejected preflight response often means the API server hasn't authorized the page's origin, method, or headers. Treat a CORS error as an API contract problem, not an invitation to keep changing JavaScript syntax.
The MDN CORS guide distinguishes requests the browser can send directly from those requiring permission first. In this model, sending a request and reading its response are different permissions: a simple request may reach your server even when JavaScript can't access the response.
Inspect the browser's actual exchange
- Classify the request. Only safelisted methods, headers, and content types qualify as simple requests. A JSON POST with an authorization header isn't one.
- Open DevTools Network and locate
OPTIONS. Inspect its request headers to see the origin, method, and header names the browser wants authorized. - Match
Access-Control-Allow-Originto the page's exact origin, including its scheme and port where applicable. - Check
Access-Control-Allow-MethodsandAccess-Control-Allow-Headers. Authorize the actual method and requested headers, includingAuthorization,Content-Type, andIdempotency-Key. - Let preflight complete successfully without a user token. Don't let authentication middleware reject
OPTIONS. Inspect redirects too, especially redirects to login pages. - Retry and inspect the actual request's response. CORS headers must also appear there, including on error responses.
CORS symptoms, causes and fixes
Access-Control-Max-Age can cache successful preflight permission, but stale proxy or CDN headers can make failures intermittent. Test the deployed route, not just the application server.
no-cors produces an opaque response. It doesn't give your dialer readable JSON or bypass authentication.
A same-origin backend avoids browser CORS requirements for the page-to-backend hop. Your backend can then forward authorized operations without exposing private upstream credentials.
Store Credentials Without Exposing Secrets
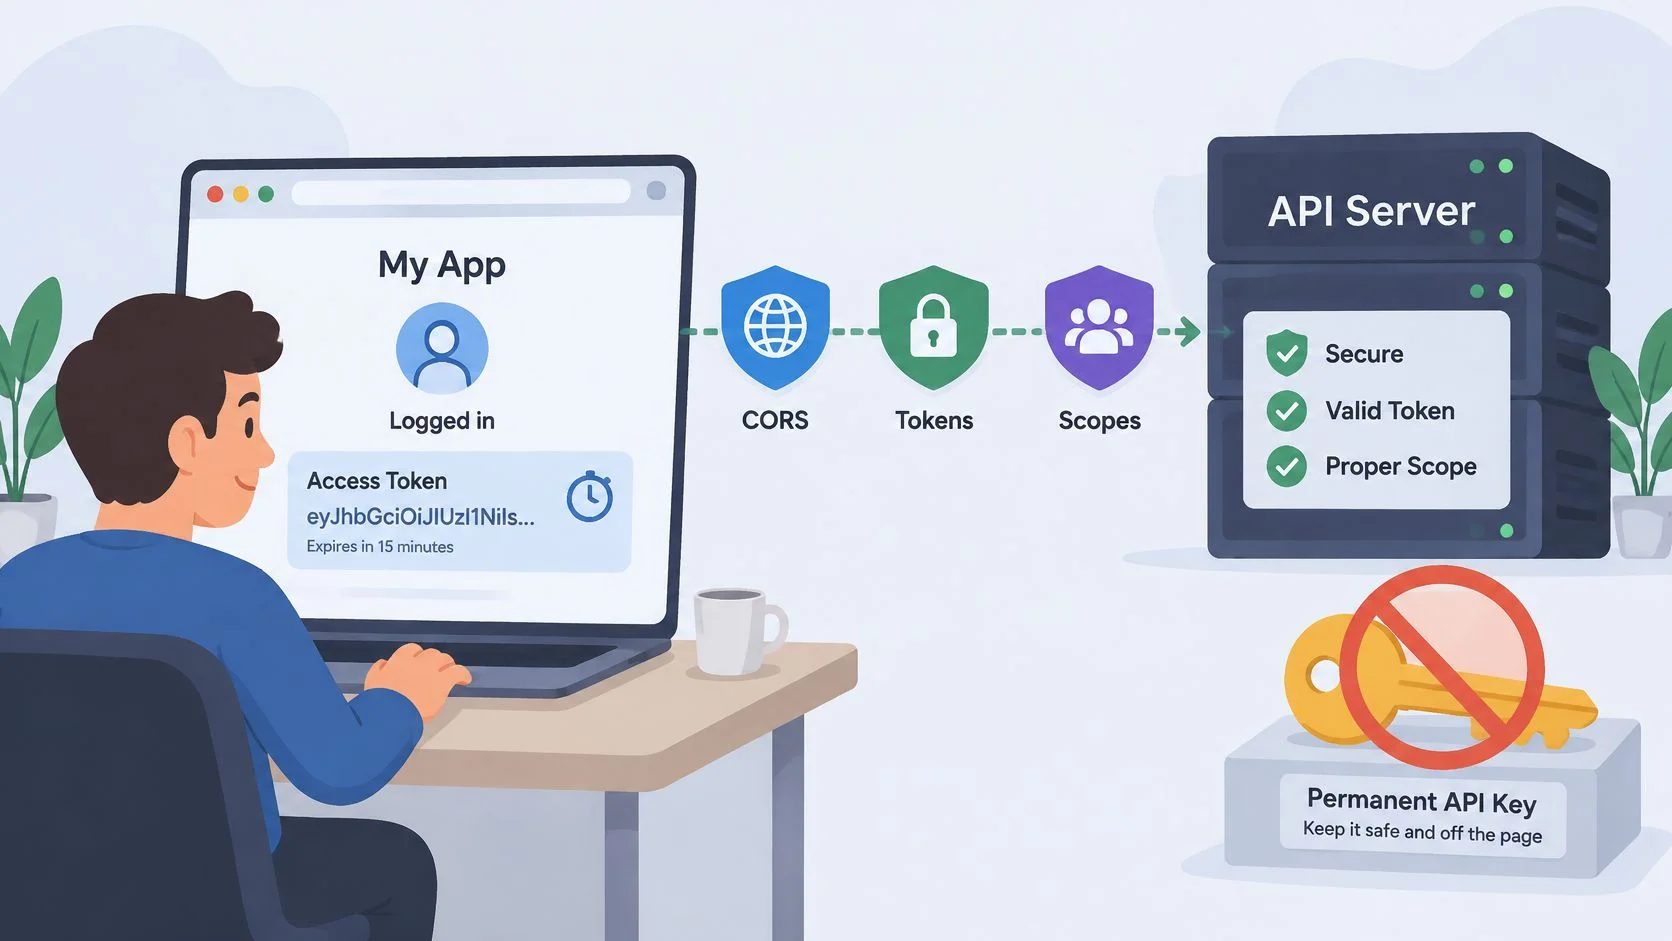
A permanent API key pasted into a Fetch header appears in DevTools to anyone who can open the page. Keep permanent credentials on the server, and give browser code only the limited access it needs.
CORS controls which origins can read responses. Authentication and authorization determine who can perform an operation, while CSRF defenses protect cookie-authenticated state changes. The OWASP CSRF prevention guidance covers origin and token defenses for those requests.

Use a server-backed credential lifecycle
- Keep permanent keys on the server, loaded through protected environment configuration or a secret store.
- Issue a short-lived, narrowly scoped access token after login.
- Hold that token in memory rather than
localStorage; a page reload then removes the page's copy. - Keep refresh credentials in an
HttpOnly,Secure,SameSitecookie, with server-controlled expiry and rotation. - Send credentials only to the intended origin. A same-origin backend-for-frontend makes that boundary easier to enforce.
- Add a CSRF token to state-changing, cookie-authenticated requests, alongside appropriate origin checks.
- Create an idempotency key per call attempt and reuse it for retries. The server must enforce deduplication; sending the header alone does not prevent duplicate calls.
In-memory storage limits persistence, but injected scripts can still access an access token. Prevent script injection, enforce authorization on the server, and restrict each token to the operations it needs.
Make exposure recoverable
Set access-token lifetimes in minutes, with the exact policy based on your risk model. If a permanent key is suspected to be exposed, rotate it and revoke affected sessions. Redact credentials from application logs and error reports.
For implementation review, consult the AppJet security documentation, then check that your own application enforces the same boundaries.
Security boundary: Anything delivered to browser JavaScript must be treated as accessible to that browser's user.
Enforce rate limits and balance checks server-side. Hidden buttons and restrictive CORS rules do not stop a non-browser client from attempting the same operation.
Handle Call Events With Webhooks and WebRTC
A live call uses a signaling exchange to establish the session and a separate WebRTC connection for audio. REST can transport signaling messages, but it doesn't become the media transport after negotiation.
The MDN WebRTC documentation describes real-time connection and DTLS-secured data channels. Be precise about encryption: WebRTC audio uses encrypted media transport with DTLS-SRTP, while data channels use DTLS.
Keep events separate from media
Your calling backend can send webhook events such as ringing, answered, completed, and failed to your server. Verify them, update the stored call record, and deliver the relevant state to the open page using server-sent events, a WebSocket, or controlled polling.
The same event-processing concerns apply outside telephony. Akinda's resource on webhooks for halal investment apps provides another domain-specific reference for webhook integration.
- Verify authenticity: Check the webhook signature before trusting the payload.
- Acknowledge promptly: Return a successful response after durable acceptance, then process asynchronously.
- Deduplicate delivery: Store event IDs so retries don't repeat side effects.
- Protect signaling: Require HTTPS, authentication, and authorization for session messages.
Sketch the signaling flow
- Create the peer connection: Use
const pc = new RTCPeerConnection({ iceServers }), attach the microphone track, callpc.createOffer(), and apply it withpc.setLocalDescription(offer). - POST the offer as JSON to your own signaling route, such as
/v1/calls/signal, using the short-lived bearer token. - Read the server-accepted answer and call
pc.setRemoteDescription(new RTCSessionDescription(answer)). - Exchange ICE candidates: Send local candidates from
onicecandidateand apply remote candidates withpc.addIceCandidate(), queuing them until the remote description is set. - Observe the connection state changing from
newtoconnected. Audio now travels through WebRTC, while REST remains available for control operations.
An answer arrives only after the signaling server accepts the offer. Display a setup state while waiting; display ringing only when a confirmed call event reports it, because accepting an offer doesn't prove the destination is ringing.
If signaling succeeds but audio breaks up, troubleshoot the media path using the VoIP call-quality guide. WebRTC encryption doesn't replace protection for signaling or webhook delivery.
Place Your First Call From the Browser
A browser call is the fastest end-to-end test because it exercises the deployed origin, authentication, and media path together. Check the live configuration before dialing.

Run the acceptance check
- Production origin: Confirm the deployed page uses the origin allowed by your browser-facing API.
- Rate display: Check that the rate shown beside the dialer matches the rate table for the destination.
- Call controls: Make sure the interface shows clear states for connecting, active, and ended calls.
Then test the user experience independently of your implementation. Open BubblyPhone in a modern browser on a laptop or phone, enter the destination, check the live calling rate table, and press call. The international calling guide explains number formatting and dialing steps.
Calls work in any modern browser, including on shared and work computers where nothing can be installed. BubblyPhone lets you call landlines and mobiles in 222 countries, without an app, SIM card, or extension.
The video demonstrates the calling experience.
Calling needs no subscription. Calls are billed per minute and rounded up to the whole minute. The optional dedicated-number plan is a separate recurring product for receiving calls, not a requirement for placing them.
Make your first call with BubblyPhone, directly in any modern browser with nothing to install. The person you call needs no app or account, and prepaid credits start at $5 and never expire.